
Migrate Target Groups to Tags
![]()
By Casey Reid; Director, Security Engineering
Introduction
Tenable deprecated target groups in Vulnerability Management on February 4th, 2022. Tenable recommends that customers use tags instead to group and scan assets in Vulnerability Management.
TipFor a quick demonstration of asset tagging, see the Understanding Asset Tagging in Tenable Vulnerability Management video on the Tenable Product Education YouTube channel.
Instead of manually migrating all of your target groups to tags, you can utilize the Vulnerability Management API and pyTenable to perform the migration automatically. This article outlines the steps required to migrate target groups to tags using pyTenable to interact with the Vulnerability Management API. Each line of Python code is explained in depth.
NoteTenable recommends that customers migrate their target groups to tags as explained in this expert article. However, if your organization exceeds the tag value limit of 1,024 objects you can migrate your target groups to text targets instead. For more information, see Migrate Target Groups to Text Targets.
To illustrate the automation we will use an example system target group called My Assets that has a number of IPs and subnets defined in the targets. Our goal is to grab all the IPs and subnets from the My Assets target group and create a new tag with the same IPs and subnets. A tag requires both a category and a value so we will use the target group's type as the category and the name as the value.
For example, the system target group My Assets will use system as the tag category and My Assets as the tag value.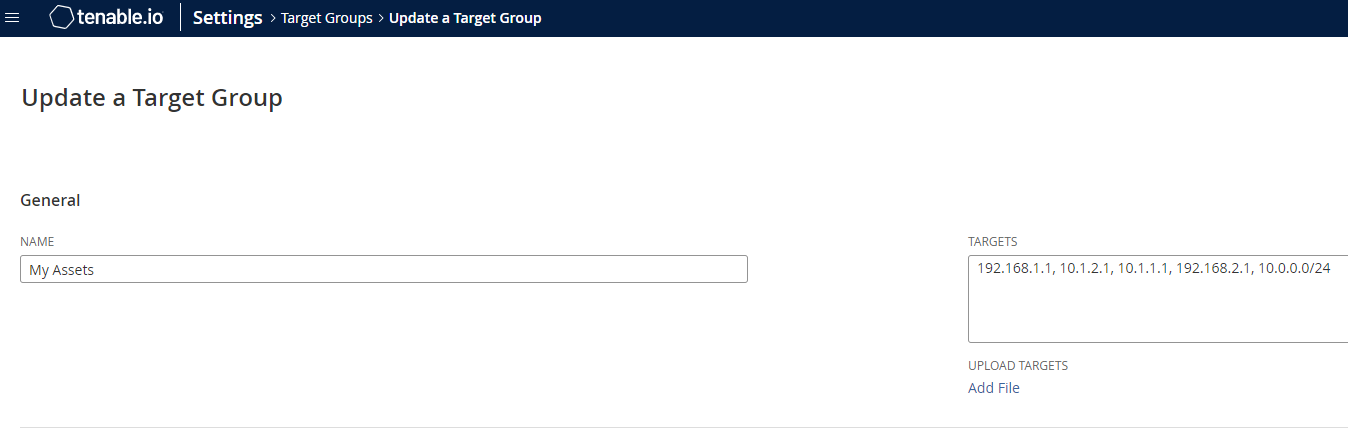
Before You Begin
This article assumes that you have learned how to authenticate to the Vulnerability Management API using pyTenable as explained in the Introduction to pyTenable article. Additionally, the examples provided below use an instantiated pyTenable object called tio as described in the Introduction to pyTenable article.
Automate the Migration
List All Target Groups
Our first step is to list all target groups in the Vulnerability Management instance and save the values. pyTenable can return a list of target groups with a simple for loop. For each target group listed in the JSON response, we can save its value into a variable called tgroup.
for tgroup in tio.target_groups.list():
    print(tgroup)
Below is a single record from the response after running the code above. We will use the name, type, and members fields to create our future tag.
{
  "acls": [
    {
      "permissions": 32,
      "owner": "None",
      "display_name": "None",
      "name": "None",
      "id": "None",
      "type": "default"
    },
    {
      "permissions": 128,
      "owner": 1,
      "display_name": "system",
      "name": "nessus_ms_agent",
      "id": 1,
      "type": "user"
    }
  ],
  "default_group": 0,
  "type": "system",
  "members": "192.168.1.1, 10.1.2.1, 10.1.1.1, 192.168.2.1, 10.0.0.0/24",
  "name": "My Assets",
  "owner": "nessus_ms_agent",
  "shared": 1,
  "user_permissions": 32,
  "last_modification_date": 1645331720,
  "creation_date": 1645331719,
  "owner_id": 1,
  "id": 5652
}
Create Variables for Name, Members, and Type
Next we need to create variables for the name, type, and members fields of each target group. These variables will help us create our pending tags. We can print out the variables to ensure we haven't made any mistakes.
for tgroup in tio.target_groups.list():
   member = tgroup['members']
   name = tgroup['name']
   group_type = tgroup['type']

   print(name, member, group_type)
Here is an an example response from the code above:
My Assets 192.168.1.1, 10.1.2.1, 10.1.1.1, 192.168.2.1, 10.0.0.0/24 system
In the output, we can see the name of the target group (My Assets), its members (192.168.1.1, 10.1.2.1, 10.1.1.1, 192.168.2.1, 10.0.0.0/24), and the target group type (system). We now have everything we need to create our Tags via the API with pyTenable.
Tag Description
When creating a tag in the user interface, you have the ability to include a description. We can utilize this description field to indicate that the tags were automatically created with a script.
description = "Imported by <script name>."Note that this step is optional, it isn't required by the API or pyTenable but is a good practice to use with automation.
Error Prevention
To prevent the script from breaking when we encounter a name conflict, we can use a try block. Additionally, we want to avoid recreating the default target group since it isn't needed. To accomplish this, we can use an if statement and the not equals operator != against the string Default.
Note that this is a case-sensitive string comparison so using default would fail.
try:
    if name != 'Default':
Create the Tags
pyTenable makes the creation of tags extremely simple by allowing us to call a function and submit the values needed for the tag creation. We can call the tags function in pyTenable as shown below:
tio.tags.create(group_type, name, description, filters=[("ipv4", "eq", str(member))])In the code sample above, filters are a list of tuples in the form of (FIELD, OPERATOR, VALUE). Since we are migrating target groups we know that the field will always be ipv4 or ipv6. Also note that member is cast as a string to avoid / in subnets. For more information about working with tags in pyTenable, see Tags in the pyTenable documentation.
NoteFor information on how to instantiate the
tioobject, see the Introduction to pyTenable article.
Next, we can finish our try block with an except and a message to alert the user when a duplicate tag is found. A duplicate tag should only be found if the script was previously executed since it's unlikely that you will have a tag category named system or user with the exact name of a previously created target group. pyTenable returns an API error when a naming conflict is encountered but we can skip this error by using pass.
except:
   print("\nDuplicate Tag found. Skipping\n")
   pass
Full Code Solution
Finally, we've arrived at the finish line! The full code sample to migrate target groups to tags using pyTenable is illustrated below:
from tenable.io import TenableIO

access_key = 'ACCESS_KEY_GOES_HERE'
secret_key = 'SECRET_KEY_GOES_HERE'

tio = TenableIO(access_key, secret_key, vendor='Casey Reid', product='Migrate Target Groups to Tags', build='0.0.1')

for tgroup in tio.target_groups.list():
    member = tgroup['members']
    name = tgroup['name']
    group_type = tgroup['type']

    description = 'Migrated from target groups via a script.'

    try:
        if name != 'Default':
            tio.tags.create(group_type, name, description, filters=[("ipv4", "eq", str(member))])
    except:
        print("\nDuplicate Tag found. Skipping\n")
        pass
After Migration
In the example above, we didn't adjust the scans that have target groups assigned and move them to their newly created tag counterpart. This is due to a current limitation in the Vulnerability Management API that limits the selection of the Targets defined by tags option. This means that you will need to manually adjust your scans to point to the new tags that were just created. If the tag is defined as a target like the example above, you will need to select so in the drop down box as shown in the screenshot below: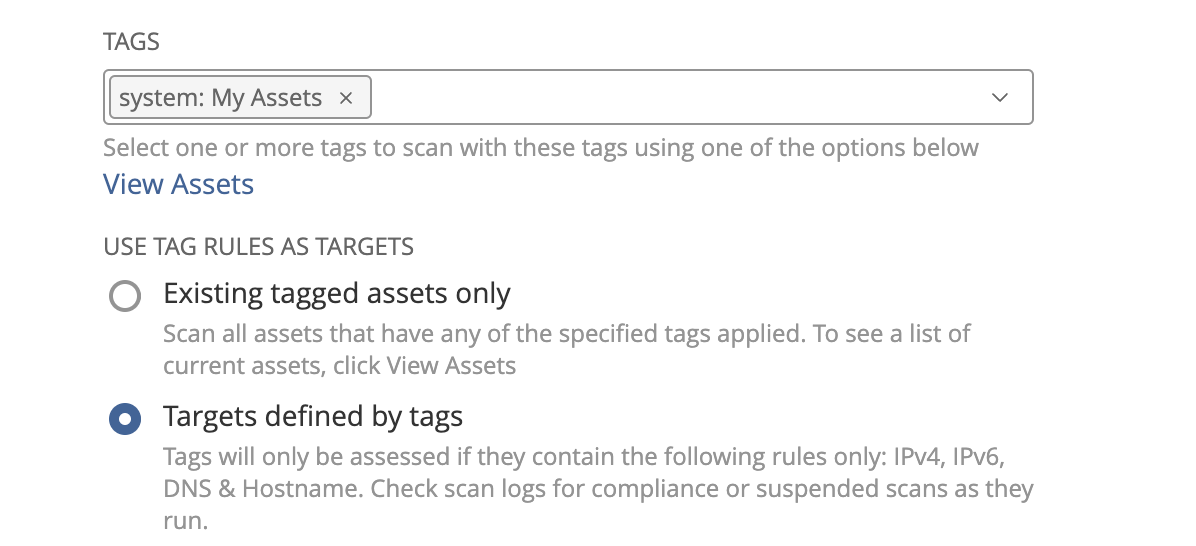
Navi
If you are not a developer and the pyTenable example above was overwhelming, you can accomplish the same task with Navi. After downloading and installing Navi via Python's package manager (pip), you can migrate target groups to tags with two commands:
navi keys -–a <access key> -–s <secret key>
navi tgroup migrate –tags
For more information about Navi, see the Navi GitHub wiki.
For More Information
Updated 5 months ago