
Migrate Target Groups to Text Targets
![]()
By Casey Reid; Director, Security Engineering
Introduction
Tenable deprecated target groups in Vulnerability Management on February 4th, 2022. Tenable recommends that customers use tags instead to group and scan assets in Vulnerability Management.
You can easily migrate all of your target groups to tags as explained in Migrate Target Groups to Tags. However, tags have a limit of 1,024 objects so it might not be possible to migrate all of your target groups to tags if your organization exceeds this limit. Most organizations will never reach this limit on tags but large enterprise environments might. If your organization exceeds this limit, you can migrate your target groups to the text target section of a scan which isn't affected by any limitations.
NoteIf possible, you should scan entire class C subnets and filter the dataset since simplicity is better than complexity when operating a vulnerability management program. However, this article assumes you are restricted to using lists of single IP addresses and smaller subnets.
You could simply copy and paste the IPs and subnets from a target group to the text targets in a scan, but it's far more efficient to automate the process, especially if you have a lot of target groups associated with a scan. This article will illustrate how to automatically migrate all of the IPs and subnets assigned to target groups associated with a scan to the targets section of the same scan.
For example, if you have a target group called My Assets with the targets 192.168.1.1, 10.1.2.1, 10.1.1.1, 192.168.2.1, 10.0.0.0/24 and a scan containing that target group, the goal is to automate the migration of the targets in the target group to the text targets section of the same scan.
-
Screenshot of a target group called
My Assetswith the targets192.168.1.1, 10.1.2.1, 10.1.1.1, 192.168.2.1, 10.0.0.0/24: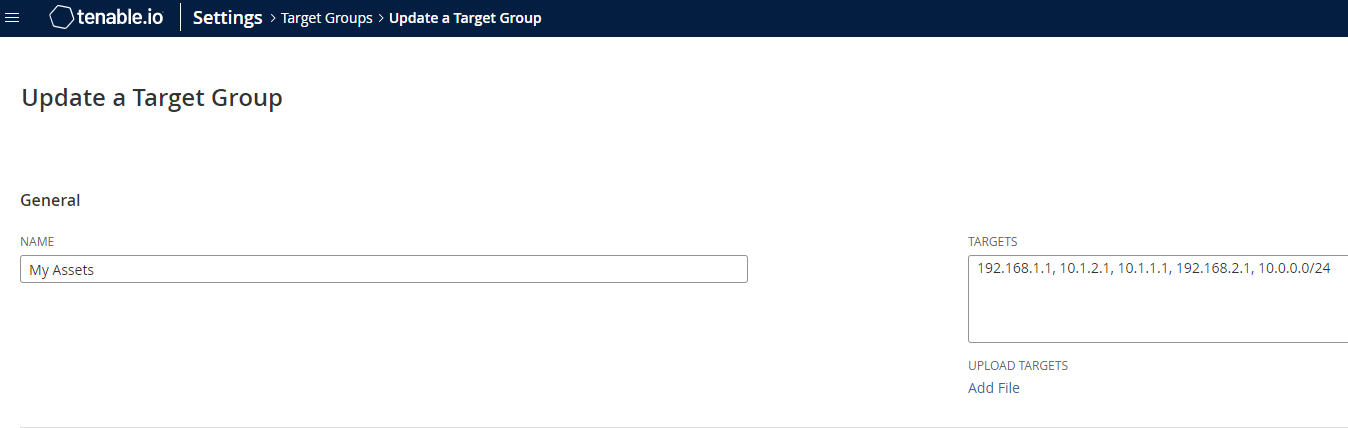
-
Screenshot of a scan containing the
My Assetstarget group: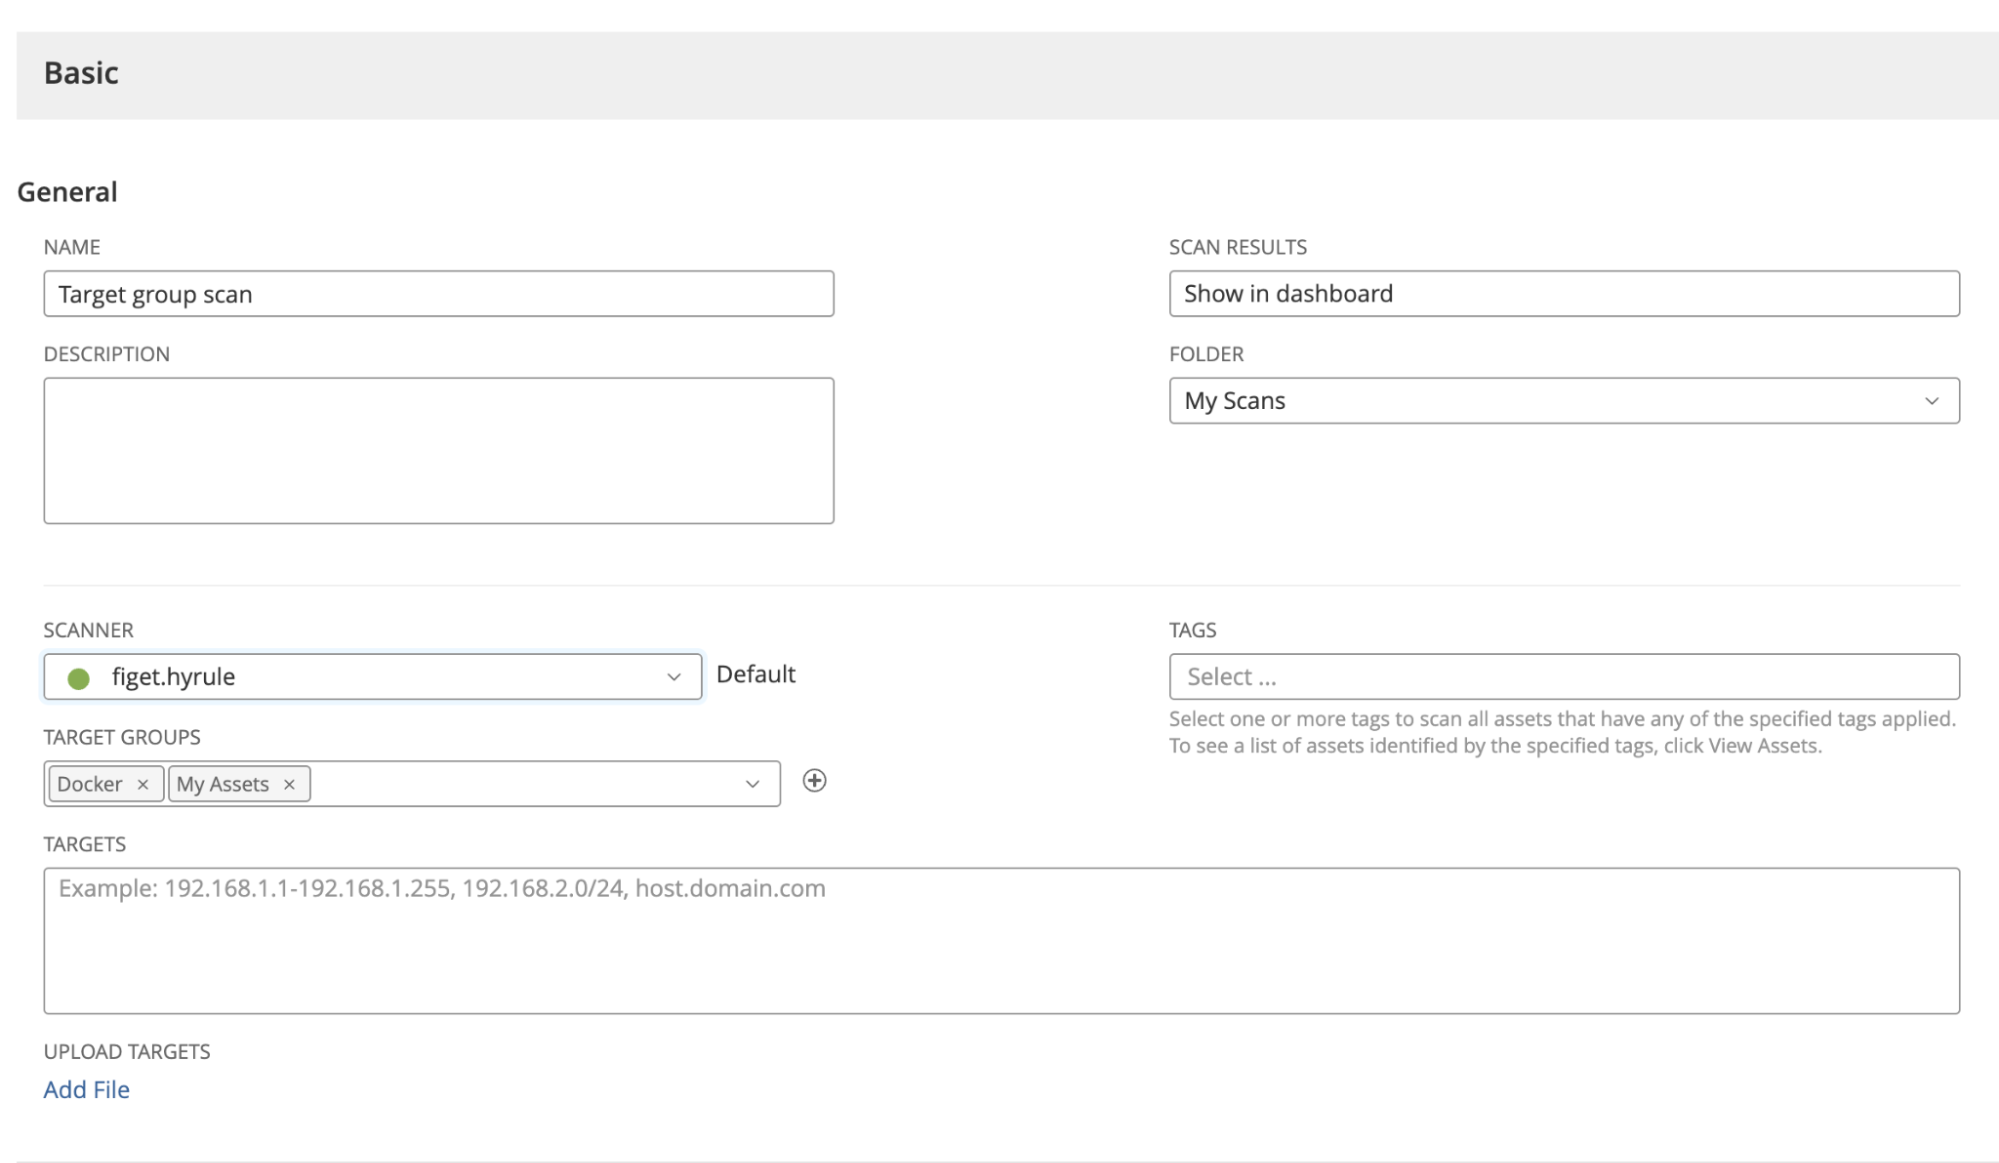
Before You Begin
This article assumes that you have learned how to authenticate to the Vulnerability Management API using pyTenable as explained in the Introduction to pyTenable article. Additionally, the examples provided below use an instantiated pyTenable object called tio as described in the Introduction to pyTenable article.
Automate the Migration
Let's outline the steps needed to migrate target groups to the text targets field of a scan. As shown in the images above, you can have a number of target groups per scan. That means we will first need to find the ID of each target group associated with the specified scan. Second, we need to retrieve the target group members (IP addresses and subnets) assigned to each target group. Third, we need to combine all members from the various target groups into one comma-separated list and then assign that list to the text targets for the scan. Lastly, to complete the migration, the existing target groups should be removed from the scan.
The diagram below illustrates the complete process.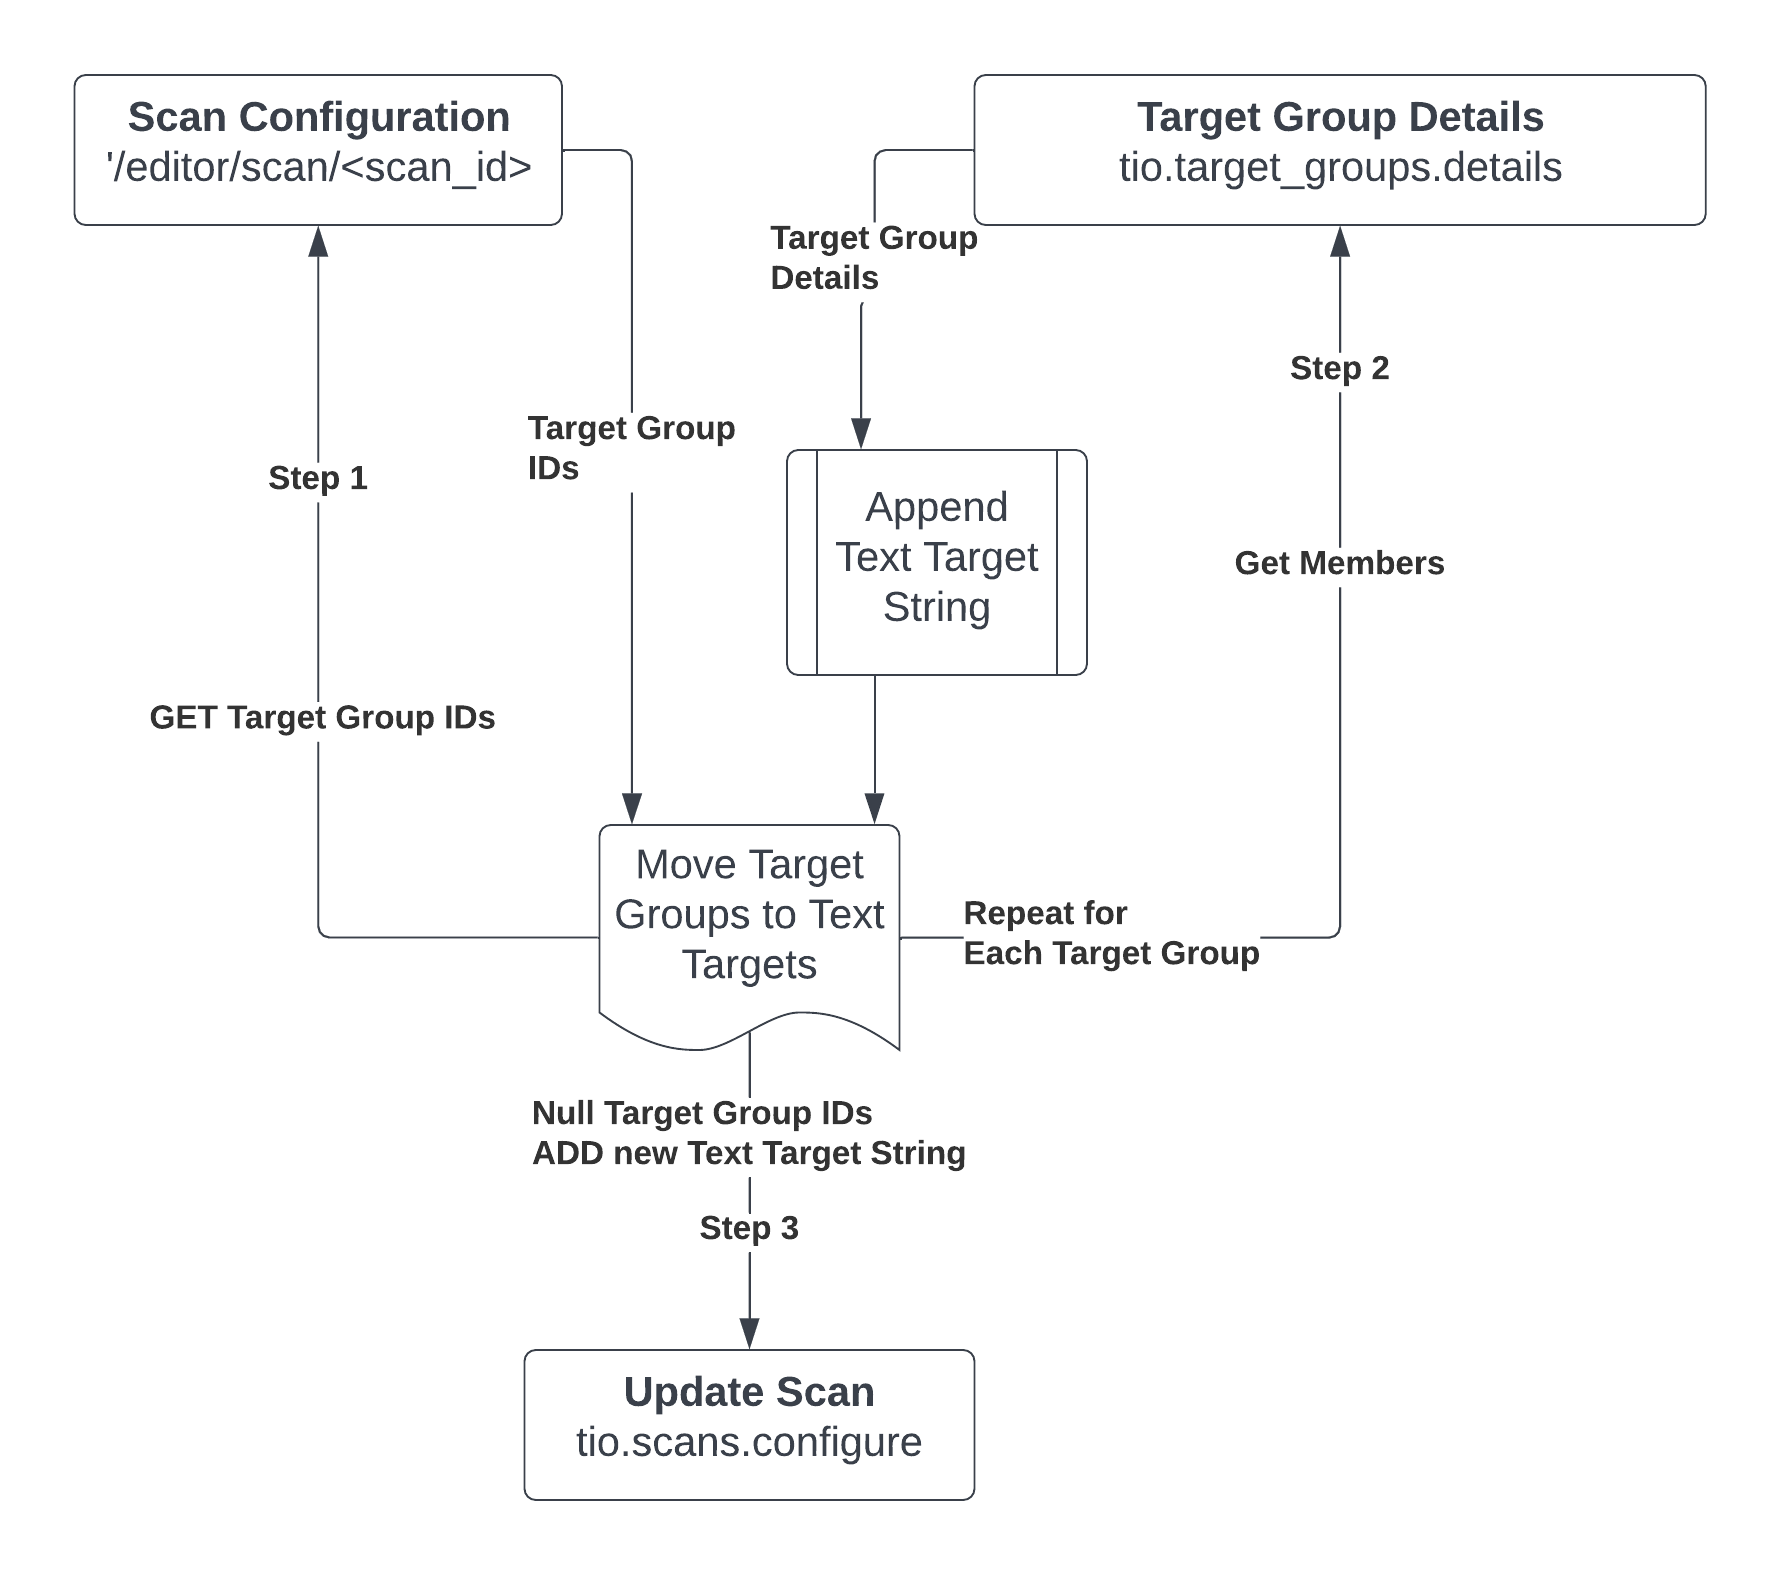
NoteThe script that we create in this article will accept a single scan ID since iterating over every scan in a Vulnerability Management instance is inefficient. However, you can add a for loop to handle more than one scan ID if you choose.
Find IDs for Target Groups Assigned to a Scan
First we need obtain the IDs for the target groups that are configured for a particular scan. To begin, we can define a function called get_target_group_ids_from_a_scan that expects a scan ID.
def get_target_group_ids_from_a_scan(scan_id):Then we can utilize pyTenable's GET function to call the /editor/scan/{scan_id} endpoint to retrieve the list of target group IDs for target groups assigned to the scan. We can ask pyTenable to provide the response in JSON by using .json(), and then we can save the response in a variable called scan_data.
NoteThe Vulnerability Management scans API does not return the target groups associated with scans so we can't use the pyTenable function
tio.scans.details(<scan_id>)to retrieve the target group IDs. Instead we need to make a raw API call to the GET /editor/scan/{scan_id} endpoint.
scan_data = tio.get('editor/scan/{}'.format(str(scan_id))).json()Note that scan_id was cast as a string using str() since pyTenable expects a string and the scan_id is an integer.
We can pause here to check our progress. I always find it helpful to print out responses as I progress when developing automation with python. We can use the pprint library to print out the JSON response and study the structure.
Import pprint

def get_target_group_ids_from_a_scan(scan_id):
    scan_data = tio.get('editor/scan/{}'.format(str(scan_id))).json()

pprint.pprint(scan_data)
The response is quite verbose since it contains every option available for the scan configuration. The items we're interested in are the objects under settings.basic.inputs. The inputs object contains an array of objects containing input data relating to the basic settings for the scan. One of these inputs will contain the target group IDs associated with the scan. We can use a for loop and an if statement to grab the list of target group IDs and print it for confirmation. The for loop will iterate over the inputs objects looking for an input with the name Target Groups. When the target groups input is found we can print the values for the default key which contains the IDs for the target groups associated with the specified scan.
for scan_basic_inputs in scan_data["settings"]["basic"]["inputs"]:
    if scan_basic_inputs["name"] == "Target Groups":
        print(scan_basic_inputs["default"])
The code above will print out a list of all target group IDs for target groups associated with the specified scan. After printing out the response for testing, we can finish off our function by replacing the print statement with a return statement instead as shown below.
def get_target_group_ids_from_a_scan(scan_id):
    scan_data = tio.get('editor/scan/{}'.format(str(scan_id))).json()

    for scan_basic_inputs in scan_data["settings"]["basic"]["inputs"]:
        if scan_basic_inputs["name"] == "Target Groups":
            return scan_basic_inputs["default"]
Retrieve and Transform Target Group Members
Now that we have a way to retrieve the target group IDs for a scan, we need to grab the members (IPs and subnets) for each target group and combine them into a comma-separated string. We can call this function get_target_group_members. It will accept the target group ID list returned by the previous function. Then, in the function, we can begin our text_target_string as shown below:
def get_target_group_members(target_group_list):
   text_target_string = ""
Next we can use pyTenable's target group details function to grab the members of each target group. The response from this function contains a lot of data, but we only need the member data, so we can use the members key in the JSON response to grab the comma-delimited members string.
tio.target_groups.details(target_id)['members']Since there might be more than one target group in the list, we can wrap the code above in a for loop and ensure that each member is appended to the text_target_string variable using python's += operator. Note the [1:] appended to the text_target_string variable in the return statement; this [1:] tells python to omit the first character of the string. This is necessary since we start the string with a comma to support the append operation when building the comma-separated list of members.
for target_id in target_group_list:
      text_target_string += ",{}".format(tio.target_groups.details(target_id)['members'])
return text_target_string[1:]
Update Scan With the New Text Target String
Alright, we're are almost to the finish line!
Our next step is to add the target group members (IPs and subnets) we retrieved in the previous step to our scan target text list. Then we need to clear the existing target groups by setting the target group list to []. Luckily, pyTenable makes it very easy to update these items in our scan. All we need is the scan_id, target_groups set to [], and our newly minted text_target_string containing the comma-separated list of members.
tio.scans.configure(<scan_id>, target_groups=[], targets=[text_target_string])Lastly, we can use our two functions together to complete the migration. While this could be a single line of code, we break it down into two lines for readability. The first line retrieves our text target string and the second line update the scan. For the purposes of this example, I'm using a scan ID of 5647.
new_text_targets = get_target_group_members(get_target_group_ids_from_a_scan(5647))
update_scan = tio.scans.configure(5647, target_groups=[], targets=[new_text_targets])
Full Code Solution
Finally, we've arrived at the finish line! The full code sample to migrate target groups to text targets for a specified scan using pyTenable is illustrated below:
from tenable.io import TenableIO
access_key = 'ACCESS_KEY_GOES_HERE'
secret_key = 'SECRET_KEY_GOES_HERE'

tio = TenableIO(access_key, secret_key, vendor='Casey Reid', product='expert-article-examples', build='0.0.1')

def get_target_group_members(target_group_list):
    text_target_string = ""
    for target_id in target_group_list:
        text_target_string += ",{}".format(tio.target_groups.details(target_id)['members'])
    return text_target_string[1:]

def get_target_group_ids_from_a_scan(scan_id):
    scan_data = tio.get('editor/scan/{}'.format(str(scan_id))).json()

    for scan_basic_inputs in scan_data["settings"]["basic"]["inputs"]:
        if scan_basic_inputs["name"] == "Target Groups":
            return scan_basic_inputs["default"]

new_text_targets = get_target_group_members(get_target_group_ids_from_a_scan(5647))
update_scan = tio.scans.configure(5647, target_groups=[], targets=[new_text_targets])

print(update_scan)
NoteReplace scan ID
5467in the code sample above with the scan ID you wish to perform the target group to text target migration on.
Navi
If you are not a developer and the pyTenable example above was overwhelming, you can accomplish the same task with Navi. After downloading and installing Navi via Python's package manager (pip), you can migrate target groups to scan text targets with two commands:
navi keys -–a <access key> -–s <secret key>
navi tgroup migrate --scan <scan_id>
For more information about Navi, see the Navi GitHub wiki.
For More Information
Updated 5 months ago